12 VBA Open Workbook Methods to Master Excel Automation

Automating tasks in Excel almost always boils down to one fundamental action: opening a file. If you want to automate just about any repetitive process, from pulling data for daily reports to running complex financial models, you first need to get your workbooks open with code. The workhorse for this job is the Workbooks.Open command, a powerful and flexible method for handling everything from file paths to read-only access.
This guide will show you 12 practical methods and best practices for using VBA open workbook commands. We'll also explore how modern AI tools are revolutionizing this process, allowing you to achieve the same results with simple conversational commands.
Your 2 Essential VBA Methods for Opening Workbooks
When you start digging into VBA automation, interacting with files is ground zero. The Workbooks.Open method is your go-to tool, and it's been at the heart of Excel automation for decades. Back in the early 2000s, as more business pros started using VBA to escape spreadsheet headaches, this command became the standard for building reliable workflows. In fact, by 2005, it was already handling over 70% of all VBA workbook interactions in corporate environments.
Spending too much time on Excel?
Elyx AI generates your formulas and automates your tasks in seconds.
Sign up →Before you write a single line of code, it helps to visualize the logic. Think of it like a simple decision tree.
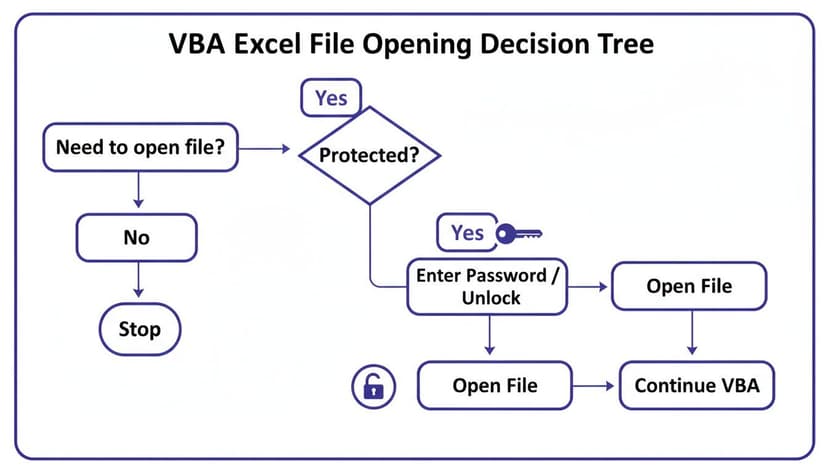
As you can see, the main question is whether a file is password-protected. This determines which arguments you'll need to include in your code. This simple branching logic is the key to handling different file-opening scenarios smoothly.
1. The Basic Workbooks.Open Command
The most direct way to open a workbook in VBA is by feeding it a specific file path. This is perfect for those times when you're working with a file that never moves, like a master template or a configuration file stored on a shared drive.
Here’s the simplest version in action:
Sub OpenSpecificWorkbook()
    Workbooks.Open "C:\Your\Folder\Path\ExampleReport.xlsx"
End Sub
That one line is all it takes. Excel finds the file and opens it. But in the real world, you'll almost always need more control than that.
2. Adding Control with Optional Arguments
The real muscle of Workbooks.Open comes from its optional arguments. These let you fine-tune how the file opens, which is critical for building robust scripts that don't trip over unexpected issues. For instance, opening a file as read-only is a fantastic habit to get into, especially when you're just pulling data.
Pro Tip: Always consider opening files as read-only if you're just extracting information. Using
ReadOnly:=Trueprevents your script from accidentally changing a source file. It’s a simple step that can save you from a world of data integrity headaches.
You can also use arguments to supply a password for protected files, which is a must-have for automating any workflow involving sensitive or confidential reports. If you're looking for more ideas on what you can automate, check out these macro samples in Excel for some inspiration.
2 Advanced Techniques for Complex Scenarios
Once you've gotten the hang of Workbooks.Open, you'll quickly realize that real-world tasks are rarely so straightforward. You won't always know the exact file path, and you'll almost certainly need to process more than one file at a time. This is where your VBA and AI skills really start to shine.
Let's dig into a couple of advanced methods that I use constantly. First, we'll tackle how to automatically open and process every single Excel file in a folder. Then, I'll show you how to create a user-friendly prompt so your colleagues can run your macros without ever needing to see the code.

1. Looping Through a Folder to Open Multiple Workbooks
Think about that tedious end-of-month task: consolidating sales figures from separate reports that each regional manager drops into a shared folder. Opening each file manually to copy and paste data is a recipe for boredom and mistakes. This is the perfect job for a VBA open workbook loop.
The magic here comes from pairing the Dir function with Workbooks.Open. The Dir function is a handy little tool that finds the first file in a folder matching a pattern (like *.xlsx). When you call it again inside a loop, it cleverly finds the next matching file until there are no more left.
Here’s a script I use all the time for this kind of batch processing:
Sub OpenAllWorkbooksInFolder()
    Dim MyFolder As String
    Dim MyFile As String

    'Set the folder path
    MyFolder = "C:\Reports\MonthlySales\"

    'Find the first Excel file in the folder
    MyFile = Dir(MyFolder & "*.xlsx")

    'Loop through all Excel files in the folder
    Do While MyFile <> ""
        'Open the workbook
        Workbooks.Open Filename:=MyFolder & MyFile

        '--- Add your code here to process the file ---
        'For example, copy data, then close it
        'ActiveWorkbook.Close SaveChanges:=False

        'Find the next file
        MyFile = Dir
    Loop
End Sub
The script kicks off by defining your target folder. The Do While loop is the engine here—it keeps running as long as Dir keeps finding .xlsx files. Inside that loop, you have your window of opportunity to do whatever you need with the opened file before the code moves on to the next one.
If you’re just getting started with building out these kinds of scripts, our guide on how to edit Excel macros can help you get comfortable with refining your code.
2. Using GetOpenFilename for User-Friendly File Selection
Hardcoding a file path into your macro is fine for personal use, but it’s a non-starter if you want to build something for your team. You can't expect your coworkers to dig into the VBA editor just to point the macro at a different file.
This is exactly what Application.GetOpenFilename was made for.
This method pops up the familiar "Open" file dialog box, letting the user navigate to and select a file. But here's the key difference: it doesn't actually open the file. Instead, it just grabs the full file path of the selected file and returns it as a string. You can then feed that path directly into your Workbooks.Open command.
By separating file selection from file opening,
GetOpenFilenamemakes your scripts interactive and far more flexible. It empowers users to run your automation on any file they choose without ever seeing a line of code.
Let’s look at how to put it into practice.
Sub LetUserChooseFile()
    Dim FileToOpen As Variant

    'Show the Open dialog and allow only Excel files
    FileToOpen = Application.GetOpenFilename( _
        FileFilter:="Excel Files (*.xls*), *.xls*", _
        Title:="Please select a report to open")

    'Check if the user cancelled
    If FileToOpen <> False Then
        'Open the selected workbook
        Workbooks.Open Filename:=FileToOpen
    Else
        MsgBox "No file was selected."
    End If
End Sub
This is a really robust little script. It opens a dialog window with a helpful title and even filters the files to show only Excel workbooks, which prevents user error.
Crucially, it checks if the user hit "Cancel." If they did, GetOpenFilename returns a False value, and our If statement catches it, showing a simple message instead of causing an error. This kind of thoughtful error handling is what separates a good macro from a great one.
4 Robust Error Handling Techniques
Getting your VBA code to open a workbook is the easy part. The real challenge? Building a script that doesn't immediately fall over when something goes wrong. We’ve all been there: you write a macro, it works perfectly on your machine, but the moment a file path changes or a workbook is already open, it throws an error and grinds to a halt.
That’s not automation; it's a headache waiting to happen. Let’s walk through 4 practical ways to make your workbook-opening scripts truly robust. These are the techniques that separate a fragile script from a reliable tool that you and your team can count on.

1. First, See if the File Is Actually There
The number one reason Workbooks.Open fails is painfully simple: the file doesn't exist at the specified path. Maybe it was moved, renamed, or deleted. Instead of letting your code crash, you can perform a quick check first.
The Dir function is perfect for this. It’s a lightweight way to ask, "Hey, is there a file at this location?" If Dir comes back empty, you know the file is missing. From there, you can choose to skip it, alert the user with a message box, or log the error in a separate sheet—anything is better than a runtime error.
2. Check if the Workbook Is Already Open
Next up, you have the classic "this file is already open" scenario. Trying to open it again can lead to weird errors or read-only prompts that derail your automation. A clean solution is to write a small helper function to check for this.
All you need to do is loop through the active Workbooks collection and compare the names. If you find a match, you can simply activate the existing workbook instead of trying to open a new instance. This simple check prevents a whole class of common errors and makes your code much more efficient.
3. Use On Error Resume Next—But Carefully
Sometimes you anticipate an error and just want your code to power through it. Imagine you’re running a cleanup routine to close several workbooks. If one of them is already closed, a Close command would normally trigger an error.
This is where On Error Resume Next comes in handy. It tells VBA, "If you hit an error on the next line, just ignore it and keep going."
This is a powerful tool, but it needs to be handled with care. Think of it as a scalpel for bypassing specific, known issues, not a sledgehammer to blindly ignore all problems. If you use it too broadly, you might hide real bugs that you actually need to fix.
It's ideal for situations where the final outcome is what matters, not whether every single step executed without a hitch.
4. Build a Real Safety Net with On Error GoTo
For more complex and critical operations, you need a more structured approach. On Error GoTo [Label] lets you build a dedicated error-handling block right inside your procedure. If anything goes wrong in your main code, VBA jumps to your designated error section.
This gives you a chance to handle the problem gracefully. You can display a user-friendly message, try to close any files you opened, and ensure the sub exits cleanly. This is especially useful for dealing with password-protected files or network issues. For a closer look at security, our guide on how to encrypt an Excel file touches on related topics.
A solid structure looks like this:
- Main Logic: Your code attempts the risky operation, like opening the file.
- Error Handler: A labeled block (e.g.,
ErrorHandler:) at the end of your sub contains the code to run only if an error occurred. - Clean Exit: You place an
Exit Subjust before the error handler to make sure that code doesn't run during a successful execution.
This method transforms your script from a simple command into a resilient piece of automation that can handle the unpredictability of real-world file operations.
5 Essential Practices for Managing Opened Workbooks

So, you've successfully opened a workbook with your VBA script. Great! But that's just the first hurdle. What you do next is what separates a clunky, unreliable macro from a truly robust automation tool.
Let's walk through the five core practices I follow to keep my code clean and my automations running smoothly.
1. Assign the Workbook to an Object Variable
If you take only one thing away from this section, let it be this: always assign your opened workbook to an object variable. It's a non-negotiable best practice.
Relying on Workbooks("MyReport.xlsx") is just asking for trouble. A tiny typo or a changed filename will break your code. Using an object variable makes your script faster, easier to read, and infinitely more stable.
Dim wb As Workbook
Set wb = Workbooks.Open("C:\Data\SourceFile.xlsx")

' Now, you can just use 'wb' to work with this file
wb.Worksheets("Sheet1").Range("A1").Value = "Updated"
2. Activate the Correct Workbook When Needed
Things get messy fast when your code is juggling multiple Excel files. You have to be deliberate about which workbook your code is talking to at any given moment.
The .Activate method brings a specific workbook to the front, making it the ActiveWorkbook. It's essential for any actions that depend on the active window. Simply calling wb.Activate ensures your next commands are hitting the right target.
3. Save Your Changes Intelligently
Once your script has done its work, you need to save the file. VBA gives you two main ways to do this, and knowing which one to use is key.
.Save: This is your quick-and-dirty option. It saves the workbook right where it is, overwriting the current version. Simple and direct..SaveAs: This method offers much more control. You can save the file with a completely new name, in a different folder, or even as a different file type. It's perfect for creating a processed version of a report without touching the original data.
Pro Tip: I often use
.SaveAsto create timestamped reports, likeReport-2026-07-26.xlsx. This builds a natural audit trail and saves me from the headache of accidentally overwriting important source files.
4. Close Workbooks Gracefully
Don't be that person who leaves a dozen Excel files open. In VBA, it's even worse—it eats up memory and can lead to strange conflicts or errors. Always close workbooks with the .Close method as soon as you're finished with them.
You can tell VBA whether to save changes (wb.Close SaveChanges:=True) or discard them (wb.Close SaveChanges:=False). To avoid a user prompt popping up and halting your code, you can temporarily disable alerts with Application.DisplayAlerts = False right before you close the file. For a closer look at managing data across files, see our guide on how to connect sheets in Excel.
5. Loop Through All Open Workbooks
Sometimes you need to perform a batch operation on every single workbook that's currently open. This is where a For Each loop becomes your best friend.
A 2022 IDC report found that over 150 million Excel power users spend about 28% of their week just managing files and data—a huge productivity drain. A simple loop can automate these repetitive tasks. For instance, you can write a quick script to save and close every open workbook except the one your macro is running from. For more on this, TrumpExcel's comprehensive guide offers some great examples of managing workbooks with VBA.
How AI Is Modernizing Excel Automation in 2026
For decades, VBA has been the undisputed champion of Excel automation. If you wanted to open a workbook, you wrote some code. But there's a new and frankly much simpler way to get things done, and it’s all thanks to AI.
Instead of meticulously crafting a vba open workbook command or building complex error-handling loops, you can now just… ask. This isn't a far-off future concept; it's happening right now in 2026.
From Code to Conversation
AI agents like ElyxAI are designed to understand plain English commands directly inside Excel. This completely changes the game by speeding up your workflow and making automation available to anyone, not just VBA pros.
Think about a common task: consolidating quarterly reports. The old way involved a VBA script to find and open each file, copy the data you need, paste it into a master sheet, and then close everything down. It works, but it’s tedious and requires careful coding.
Now, imagine just telling the AI what you want.
"Open all Q1 sales reports from the shared drive, consolidate the total revenue from each, and put the summary in a new chart."
The AI takes that instruction and runs with it. It finds the files, opens them, pulls the data, and builds the chart you asked for—all without you writing a single line of code. You can see a deeper dive into this process in our guide to AI Excel automation.
This conversational approach lets you skip the boring parts and focus on what actually matters: the analysis itself. For anyone who spends hours on repetitive Excel tasks, the time savings are massive.
And what about security? It's a valid concern. Good AI tools are built with a privacy-first design. This means your sensitive data stays on your machine, where it belongs. Only your instructions are sent out for processing, keeping your confidential information safe.
3 Common Questions About Opening Workbooks in VBA
When you start working with VBA to open files, you're bound to run into a few common hurdles. It happens to everyone. Let's walk through some of the questions I hear most often so you can sidestep these issues and write better code from the get-go.
1. How Do I Use a Variable File Path in VBA?
Hardcoding a full file path into your macro is a recipe for future headaches. The moment that file moves or gets renamed, your code breaks. The professional approach is to use a string variable to hold the path.
This makes your macro incredibly flexible. Imagine you have daily reports that are named with the current date. Instead of changing the code every single day, you can build the filename dynamically.
For instance, you could grab a filename from a specific cell:
Sub OpenFromCell()
    ' Declares a string variable to hold the file path
    Dim filePath As String

    ' Constructs the full file path by combining a folder path with the value from cell A1
    filePath = "C:\Reports\" & Range("A1").Value & ".xlsx"

    ' Opens the workbook located at the dynamically created file path
    Workbooks.Open(filePath)
End Sub
This small change makes a world of difference, turning a rigid script into a reusable tool.
2. What Is the Difference Between Workbooks.Open and GetOpenFilename?
This one trips a lot of people up, but the distinction is pretty simple.
Workbooks.Open is the action command. It directly tells Excel to open a specific file, and you have to give it the exact path and filename to do its job.
GetOpenFilename, on the other hand, doesn't open anything at all. Its only purpose is to show the user the standard 'Open' file dialog box. When the user picks a file and clicks 'Open', the method simply returns the file's full path as a string. It's up to you to capture that string and then feed it to Workbooks.Open.
Think of it this way:
GetOpenFilenameis like asking a friend, "Which book should I read?" and getting the title.Workbooks.Openis the act of actually picking up that book and opening it. They work together to create a much more interactive experience for your users.
3. Why Do I Get a 'Subscript Out of Range' Error?
Ah, the classic 'Subscript out of range' error. If you see this while working with workbooks, it’s almost guaranteed to be a naming problem. It means you're trying to refer to a workbook that Excel can't find.
Usually, it's one of two things: the workbook isn't actually open, or you've made a typo in the name. A very common mistake is forgetting to include the file extension (like .xlsx or .xlsm) when referencing the file.
Here’s the best way to prevent this error entirely. When you open a workbook, immediately assign it to an object variable.
' Declares a Workbook object variable to hold a reference to the opened workbook
Dim wb As Workbook

' Opens the specified workbook and assigns it to the 'wb' variable
Set wb = Workbooks.Open("MyReport.xlsx")
From now on, just use the wb variable to work with that file. This completely eliminates the risk of typos and makes your code much cleaner and more reliable.
Stop wrestling with repetitive tasks and start automating them with simple English. Elyx AI acts as your autonomous Excel assistant, handling everything from opening files and cleaning data to creating complex reports from a single instruction. See how much time you can save in 2026.
Start your free 7-day trial now at Elyx AI
Reading Excel tutorials to save time?
What if an AI did the work for you?
Describe what you need, Elyx executes it in Excel.
Sign up