Create Address Labels from Excel in 5 Minutes

You’re probably staring at a spreadsheet that looked manageable an hour ago and now feels dangerous. Some rows have full names in one cell, some ZIP codes lost their leading zeros, one address line has random extra spaces, and somebody typed “St.” in one row and “Street” in the next. Meanwhile, the envelopes are waiting.
That’s the core problem with address labels from excel. The actual printing part is rarely the hardest step. The hard part is getting the data into a state that won’t sabotage the print run. Most tutorials skip that and jump straight to Word. That’s why people follow every menu click correctly and still end up with bad labels.
Your Guide to Perfect Address Labels Every Time
Mail merge has been around for a long time because it works. Microsoft’s mail merge feature was first introduced in Word 2.0 in 1991, and it’s now used by over 500 million Office users annually, accounting for about 15% of Word document generations in business environments. Microsoft also says it saves professionals 2 to 3 hours per 1,000 labels printed through the standard workflow for lists and labels, according to Microsoft’s label printing documentation.
Spending too much time on Excel?
Elyx AI generates your formulas and automates your tasks in seconds.
Sign up →That tells you two things. First, this is not a niche office task. Second, the process is still common enough that getting good at it pays off fast.
The catch is that mail merge is only as good as the spreadsheet feeding it. If the Excel file is clean, Word behaves. If the Excel file is messy, Word prints your mistakes at scale. That’s why seasoned office teams care as much about preparation as they do about the template itself.
If you’re buying sheets for larger runs, it also helps to start with stock that matches your actual mailing job. For warehouse, shipping, and inventory-heavy environments, Material Handling USA labels are worth reviewing because product fit matters as much as the merge itself.
What usually goes wrong
Most failed label jobs come from one of four places:
- Dirty source data that contains duplicates, gaps, or inconsistent formatting
- Wrong label stock selection in Word, even when the sheet looks close enough
- Bad spacing choices in the first label that get copied to the entire page
- Printer settings that inadvertently scale or shift the output
Practical rule: If the first label is imperfect, every label after it will be imperfect faster.
When names and address parts are scattered across columns, one of the handiest prep skills is combining text cleanly before you merge. A simple guide on how to combine text in Excel helps when you need to build a consistent full-name or single-line address field from messy source columns.
Preparing Your Excel Data for 99% Flawless Labels
Most label problems begin in Excel, not in Word, and that’s where experienced users save the most time. Professionals often spend 30% to 40% of their label project time cleaning and validating address data, especially when dealing with duplicates, missing fields, and inconsistent formatting such as “Street” versus “St.”, as noted in this address data preparation walkthrough.

Start with a sheet structure Word can trust
A good mailing sheet is boring. That’s the point.
Use one row per recipient. Put each data type in its own column. Typical headers include:
| Column | What belongs there |
|---|---|
| First Name | Given name only |
| Last Name | Surname only |
| Address | Street number and street name |
| Address 2 | Suite, apartment, floor, building |
| City | City only |
| State | State or region |
| ZIP | Postal code stored carefully |
| Country | Especially useful for international mail |
Don’t mix full addresses into one giant cell unless you know your label format will always use them exactly that way. Granular columns give you more control when you need to fix or rearrange the output.
Use formulas to clean visible and invisible mess
Two formulas solve a surprising number of problems.
=TRIM(A2)
Use TRIM() when cells contain extra spaces before, after, or between words.
If A2 contains 125 Main Street , TRIM(A2) returns 125 Main Street.
Why it matters: extra spaces can push lines down, break matching, or make duplicate checks fail. A record that looks identical to the eye may not be identical to Excel if hidden spaces are involved.
=PROPER(B2)
Use PROPER() to standardize capitalization.
If B2 contains jANE DOE, PROPER(B2) returns Jane Doe.
Why it matters: labels are customer-facing. Inconsistent capitalization looks sloppy fast, especially in bulk mailings.
You can combine both when source data is rough:
=PROPER(TRIM(B2))
That formula first removes extra spaces, then fixes capitalization. It’s a strong cleanup pattern for names, cities, and street text.
Clean first, merge second. Trying to “fix it in Word” usually creates more manual work, not less.
Flag bad rows before they print
Don’t rely on visual scanning alone. Add helper columns that tell you which rows are incomplete.
Examples:
Missing street address
=IF(C2="","Missing Address","")Missing ZIP
=IF(G2="","Missing ZIP","")Combined completeness check
=IF(OR(C2="",E2="",F2="",G2=""),"Review","OK")
These formulas let you filter the sheet before you merge. That’s much safer than discovering blank fields during preview.
Duplicates are another common failure point. If one customer appears twice, you may not notice until the labels are already printed. This guide on how to filter duplicates in Excel is useful when you need a quick and reliable deduplication pass before any print run.
A short pre-merge checklist that actually works
Before opening Word, check these five things:
- Headers are clear: Avoid vague labels like “Info” or “Location”
- No blank rows: Blank rows can interrupt the recipient list
- No merged cells: They break downstream workflows
- ZIP codes are reviewed: Especially if your list contains codes with leading zeros
- Address variants are standardized: Pick one style and stick to it
This is the least glamorous part of creating address labels from excel. It’s also the part that separates a clean mailing from an expensive reprint.
The 5-Step Manual Mail Merge in Word
Once the spreadsheet is clean, the traditional Word route is dependable. It’s not elegant, but it gives you tight control over layout. That matters when you need to match a physical label sheet exactly.
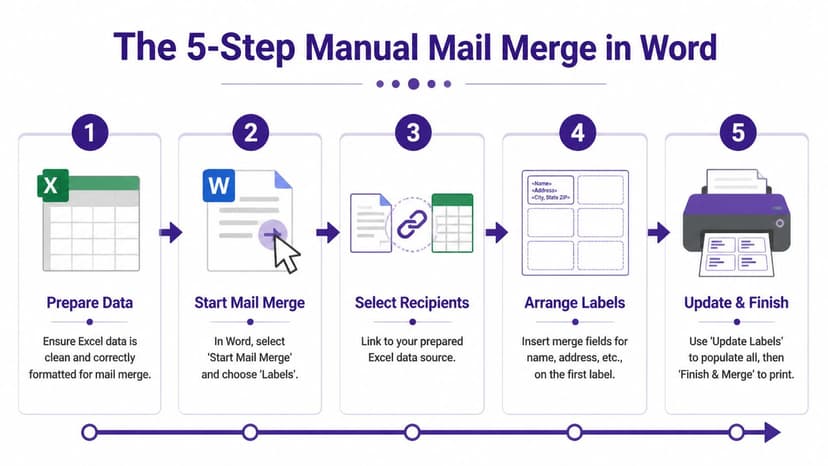
Step 1 and step 2
Open Word, go to Mailings, then choose Start Mail Merge and select Labels. From there, choose the label vendor and product number that match your physical sheet.
This is not a place to guess. Similar product numbers can produce slightly different spacing, and slight spacing errors are enough to ruin an entire page.
Next, use Select Recipients and choose your Excel file. If the workbook has multiple sheets, make sure you select the right one. Also confirm that Word recognizes the first row as headers.
Step 3
Now build the first label by inserting fields one by one. That manual approach is still the best option when you care about exact layout.
The most reliable pattern looks like this:
<<First_Name>> <<Last_Name>><<Address>><<City>>, <<State>> <<ZIP>>
Users who want granular control usually insert each merge field individually and add manual line breaks themselves. One important formatting detail often gets missed. To control vertical spacing properly, open the Paragraph dialog from the first label and uncheck “Don’t add space between paragraphs of the same style”, as shown in this mail merge formatting walkthrough.
The first label is the master. Treat it like a template, not a sample.
Step 4 and step 5
After the first label looks right, click Update Labels. This is the button many people forget. Without it, only the first label has the correct field structure.
Then use Preview Results and inspect the ugly rows on purpose. Don’t just check the first few clean records. Find the longest names, the apartment addresses, and the records with edge-case formatting.
A practical trick here is to finish the merge into a separate document before printing. That gives you one more chance to catch line-wrap problems.
If your source data began life inside a Word table instead of Excel, moving it first can save a lot of trouble. This tutorial on converting a table from Word to Excel is a useful cleanup move before you even start the merge.
Manual mail merge works best when
| Situation | Manual Word merge is a good fit |
|---|---|
| Small to medium batches | Yes |
| Standard label stock | Yes |
| Heavy customization | Sometimes, but it gets tedious |
| Messy raw data | No, fix Excel first |
| Frequent repeat jobs | Only if you save a solid master file |
The manual process still earns its place. But it asks for patience, and it punishes careless setup.
7 Common Label Printing Problems and Their Fixes
Even when the merge is technically correct, printing can still go sideways. Standard tools also struggle with edge cases such as international addresses with variable fields and personalized logic, which is why many users give up once the workflow moves beyond simple domestic labels, as discussed in this mailing label troubleshooting guide.
1. Only the first label prints correctly
Symptom: the first label shows data, but the rest are blank or incomplete.
Fix: go back and click Update Labels after formatting the first label. Word doesn’t automatically copy your field arrangement across the page unless you tell it to.
2. Text drifts outside the label borders
Symptom: lines are too low, too high, or spill into the next label.
Fix: verify the vendor and product number first. Then print a test sheet on plain paper at actual size and hold it against the label stock. In real offices, that simple check saves more sheets than any software trick.
3. ZIP codes lose leading zeros
Symptom: a ZIP like 02110 becomes 2110.
Fix: store the ZIP column as text before the merge. If the damage is already done, convert the values back into text format and recheck the data before printing. If Excel keeps “helping” in the wrong way, this article on how to convert numbers to text in Excel is the right fix.
4. Long addresses wrap badly
Symptom: apartment, suite, or building details force awkward line breaks.
Fix: use a smaller font, shorten unnecessary punctuation, or split Address 1 and Address 2 properly. Don’t cram everything into a single field if your stock has limited vertical space.
A label that technically prints but is hard to read still failed.
5. Duplicate recipients appear twice
Symptom: two labels print for one person because the source list had repeated rows.
Fix: deduplicate in Excel before merging. This problem often hides inside combined exports from CRM, finance, and event systems. It’s boring work, but duplicate labels make operations look careless.
6. International addresses don’t fit your domestic format
Symptom: state and ZIP assumptions break when the destination uses provinces, postal codes, or different line order.
Fix: create a separate layout for international recipients, or use conditional fields if your process supports it. Trying to force every country into one rigid U.S.-style structure usually creates unreadable output.
7. Specialty stock prints poorly
Symptom: the template is fine, but the physical label material feeds differently or smudges.
Fix: match your printer settings to the stock and test on the exact material you’ll use. If your workflow uses roll labels instead of standard office sheets, it helps to review the material and format details first. For shipping-style formats, Business Mail Boutique 6×4 labels are a useful example of stock that suits a different print workflow than typical sheet-based address labels.
Fast diagnosis table
| Problem | Most likely cause | First fix to try |
|---|---|---|
| Blank labels after the first | Update Labels skipped | Rebuild first label, then update |
| Misalignment | Wrong template or scaling | Check product number and print test sheet |
| Missing zeros | ZIP stored as number | Convert ZIP to text |
| Overflow text | Too much content per line | Reduce font or split fields |
| Bad international output | One-size-fits-all format | Create alternate layout |
A Faster Way Generate Labels from Excel in 60 Seconds with AI
The standard process still works, and plenty of teams rely on it every day. Avery states that over 50 billion adhesive labels are printed annually using Excel mail merge workflows, and a 2022 survey found 67% of SMBs use this method for mailings, with 40% savings on outsourcing costs when producing labels in-house, according to Avery’s mail merge import guide.
That scale explains why people keep using the method. It also explains why a better workflow matters.

Where the manual process breaks down
Mail merge is efficient only after the data is clean, the fields are mapped, the layout is tested, and the print settings are stable. In practice, that means one task turns into a chain of tasks:
- Clean names and address fields
- Remove duplicates
- Standardize formatting
- Check missing records
- Build the merge in Word
- Preview awkward rows
- Test print
- Fix whatever still broke
That’s not hard in the abstract. It’s hard when you’re doing it under deadline with a live recipient list.
AI-based spreadsheet automation offers a more practical alternative to menu-by-menu manual work. The strongest use case isn’t “help me understand mail merge.” It’s “do the prep work and generate the output without making me babysit every step.”
What a better workflow looks like
Instead of manually chaining formulas, filters, and Word steps, an AI agent inside Excel can handle the workflow from the spreadsheet itself. A plain-language request can clean duplicates, standardize address fields, organize columns, and prepare printable output in one pass.
That matters most for office teams dealing with mixed exports from sales tools, finance systems, event lists, and internal directories. Those lists usually don’t fail because people don’t know where the Mailings tab is. They fail because the input is inconsistent.
For teams that already build assets from spreadsheets in other contexts, LPagery for spreadsheet page creation is a helpful example of the same broader idea. Structured spreadsheet data becomes much more valuable when software handles the repetitive build process for you.
A short demo helps make that shift concrete:
Why AI is the better fit for repeat work
The main benefit isn’t just speed. It’s consistency.
A manual workflow depends on whether the user remembered every small step. An automated workflow applies the same logic every time. That’s especially useful when you handle repeated mailings, shared workbooks, or address lists maintained by multiple departments.
If you work in analysis, operations, finance, or reporting, this is the broader shift happening inside Excel. AI is moving from formula suggestion to full workflow execution. This guide on the AI agent for data analysis shows the same pattern in a different use case. The software doesn’t just advise. It performs the work.
The biggest label improvement usually isn’t a better template. It’s removing manual cleanup from the process.
The Right Method for Your Next Mailing
If you need full control, standard sheet labels, and a process you can inspect line by line, the manual Word mail merge route is still a solid professional skill. It works best when the source file is already clean and the layout requirements are predictable.
If your real problem is upstream chaos, the manual route starts feeling expensive. Not always in money. In attention. In rework. In the time lost checking rows that should’ve been standardized before anyone opened Word.
For occasional jobs, a careful Excel cleanup plus a saved Word master file is enough. For repeated jobs, larger lists, or messy source data from multiple systems, an AI-driven workflow is the more sensible option because it removes the commonly underestimated step: preparation.
The practical takeaway is simple. Don’t judge the label job by whether Word can print it. Judge it by whether the data is reliable before printing starts. That’s where good mailings are won.
AI inside Excel is changing ordinary office work in exactly this way. It’s taking repetitive, fragile sequences and turning them into one executable request. Address labels are just one example, but they’re a good one because the weak spots are so easy to see on paper.
If you work in Excel every day and want the software to execute multi-step tasks instead of just suggesting formulas, Elyx AI is worth a look. It runs inside Excel, understands plain-language instructions, and handles workflows like data cleaning, formatting, analysis, and spreadsheet preparation without forcing you through every manual step yourself.
Reading Excel tutorials to save time?
What if an AI did the work for you?
Describe what you need, Elyx executes it in Excel.
Sign up