A Quick Guide on How to Remove Duplicate Rows in Excel

Duplicate rows in a spreadsheet are more than a minor annoyance—they're a silent threat to your data's integrity. They can skew your analysis, leading to inaccurate sales figures, inflated customer counts, and business strategies built on flawed information.
Imagine a marketing team accidentally sending multiple emails to the same customer due to a duplicated contact list, or a sales manager analyzing inflated performance metrics from duplicated orders. These aren't just hypotheticals; they're the real-world consequences of unmanaged data. In high-stakes fields like finance or legal compliance, a single duplicate entry can escalate into a significant liability.
International investigations, especially in legal and financial sectors, grapple with duplicate data overwhelming reviews… In financial services, a Validity survey found 44% of respondents hampered by duplicates in leveraging data fully, triggering false anti-money laundering alerts and wasting compliance teams' time on redundant checks instead of real threats.
Spending too much time on Excel?
Elyx AI generates your formulas and automates your tasks in seconds.
Sign up →
This highlights a critical point: knowing how to find and remove duplicate rows is not just a handy spreadsheet trick. It's an essential skill for anyone who relies on data to make informed decisions.
The simplest, most direct way to eliminate duplicates is with Excel’s built-in "Remove Duplicates" tool, found under the Data tab. It's a fast, one-click solution that permanently deletes entire rows based on the columns you specify, always preserving the first unique record it finds.
Choosing Your Deduplication Strategy
But which method is right for your specific task? The answer depends on your goal. Do you need a quick, permanent cleanup, or a more flexible, non-destructive approach that allows for review?
This decision tree provides a straightforward workflow for picking the best tool for the job.
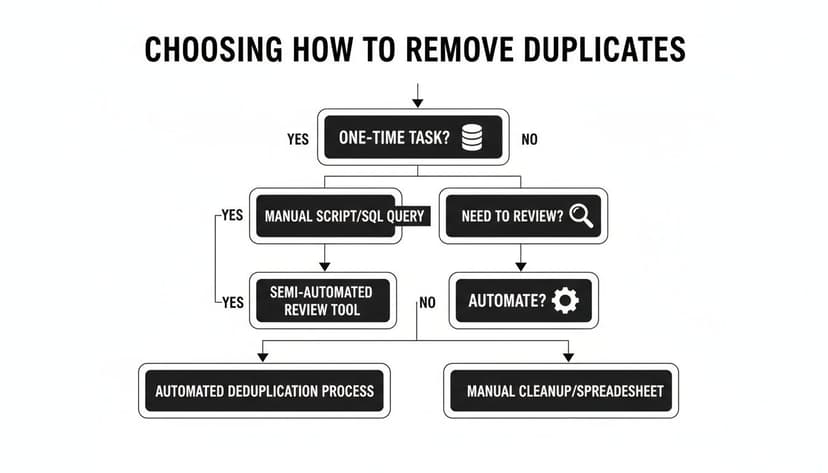
As you can see, the path you take depends on whether it's a one-time task, if you need to review the duplicates before deleting, or if you need to automate the process for recurring reports.
The Bigger Picture of Data Quality
Ultimately, removing duplicates is just one component of the broader practice of data cleaning. For long-term data reliability, establishing strong cloud data governance best practices is essential. A proactive approach helps you manage and prevent duplicates from infiltrating your datasets in the first place.
For a comprehensive look at maintaining data integrity, you might find our guide on how to clean data in Excel helpful.
Choosing Your Method for Removing Duplicates
To help you decide quickly, here’s a comparison of the primary methods for removing duplicate rows in Excel. It breaks down which tool is best suited for your specific task.
| Method | Best For | Data Impact | Skill Level |
|---|---|---|---|
| Remove Duplicates | Quick, permanent deletion of entire rows | Destructive (deletes data) | Beginner |
| Advanced Filter | Creating a new, unique list elsewhere | Non-destructive (copies data) | Beginner |
| Conditional Formatting | Visually identifying duplicates for review | Non-destructive (highlights only) | Beginner |
| Formulas (COUNTIF) | Flagging duplicates with a helper column | Non-destructive (adds data) | Intermediate |
| Power Query | Repeatable, automated cleanup on large datasets | Non-destructive (new output) | Intermediate |
| VBA | Custom, fully automated solutions for complex tasks | Can be destructive or not | Advanced |
Each of these tools has its purpose. Your choice will come down to whether you need speed, flexibility, or automation. Throughout this guide, we'll dive into each one and show you how AI assistants like Elyx.AI can make even the more advanced methods surprisingly accessible.
The Easiest Way to Remove Duplicates
When you need to get the job done quickly, Excel's built-in Remove Duplicates tool is your best option. You'll find it right on the Data tab, and it's by far the most direct way to permanently delete redundant rows from your dataset. It's perfect for one-off cleanup jobs where a manual review of every duplicate isn't necessary.

Let's walk through a real-world example. Say you're compiling a customer contact list for a marketing campaign by merging data from multiple sources. You know there will be overlaps, and sending multiple emails to the same person is unprofessional. This is exactly the scenario the Remove Duplicates tool was designed to solve.
A Practical Walkthrough
Using the tool is straightforward. First, click anywhere inside your data range—Excel will automatically select the entire table. A best practice is to always work on a copy of your original data to prevent accidental data loss. With your data ready, navigate to Data > Remove Duplicates.
A dialog box will appear, listing all the columns in your table. This is where you define what constitutes a "duplicate."
- If you select all columns, Excel will only remove a row if it is a perfect match to another in every cell.
- If you only check the 'Email' column, any row with a duplicate email address will be removed, regardless of other differing information.
This level of control makes the tool highly effective. For our marketing list, checking only the 'Email' column is the most logical approach to ensure each contact is unique. After clicking OK, Excel will report how many duplicates it found and removed, leaving you with a clean list.
Pro Tip: The Remove Duplicates tool always keeps the first record it encounters and deletes subsequent matches. If you need to keep the most recent entry, sort your data by date (newest to oldest) before using the tool. This ensures the latest record is the "first" one Excel sees and preserves.
Simplifying the Process with AI
While the tool is simple, selecting the correct columns can be tricky. A wrong choice could lead to deleting valuable data. This is where an AI assistant like Elyx.AI can streamline the process. Instead of manually selecting columns, you can describe your goal in plain English.
For example, you could instruct Elyx.AI, "Identify and remove rows that have the same customer email and order ID." The AI interprets this context, guides you to the correct column selections for the Remove Duplicates tool, and helps prevent common errors, making the cleanup process both faster and more accurate.
Using Formulas to Find and Manage Duplicates
Sometimes, outright deleting duplicates isn't the right move. You might need to review them first or maintain a complete record of all entries. In these cases, formulas provide a flexible, non-destructive solution. Instead of permanently altering your data, you can use formulas to flag duplicate rows, giving you full control over the next steps.
A time-tested method is using the COUNTIF function. The concept is simple: you create a "helper" column to count the occurrences of each value in your dataset.
For instance, to check for duplicate emails in column B, you would add the formula =COUNTIF(B:B, B2) to a new column. After dragging the formula down, any row with a count greater than 1 is identified as a duplicate. This provides a clear, visual flag on every redundant row.
Dynamic Lists with UNIQUE and FILTER
If you are using a modern version of Excel, you have access to even more powerful functions. The UNIQUE function is a game-changer, allowing you to instantly generate a clean list of unique records that updates automatically as your source data changes. This is ideal for building dynamic dashboards or summary tables that must remain current.
For example, creating a clean list of customer names from column A is as simple as entering =UNIQUE(A2:A100). No helper columns or filtering needed—just a single, dynamic formula.
You can also combine UNIQUE with the FILTER function for more advanced tasks. This pairing enables you to extract entire rows of unique records based on criteria in one or more columns, providing an automated way to isolate the precise data you need. We explore this in our UNIQUE function in our detailed guide.
The need for accurate de-duplication goes far beyond standard business reports. In academic research, for instance, systematic reviews depend on it for data integrity. A recent study highlighted that specialized tools could hit sensitivity rates of up to 99%—matching human accuracy but finishing in under an hour what would take a person days. This level of precision is essential for credible scientific results, where even a handful of duplicates can completely skew the findings. You can read the full research on advanced de-duplication techniques.
Let AI Write Your Formulas
Formulas offer incredible flexibility, but mastering the syntax for a complex FILTER or a nested COUNTIFS function can be challenging. An AI assistant like Elyx.AI eliminates this barrier.
Instead of struggling with syntax, you can simply describe your objective in plain English:
- "Flag all rows where the email in column C and the order ID in column F are duplicated."
- "Create a new list on a separate sheet showing only the unique customer names from the master list."
Elyx.AI translates your request into the precise Excel formula needed, instantly. It acts as an on-demand formula expert, saving you the time and frustration of trial-and-error and making advanced deduplication methods accessible to all users.
Automating Your Data Cleanup with Power Query
If you find yourself cleaning the same messy report every week or month, it's time to automate. Manual repetition is not only tedious but also a breeding ground for errors. For any recurring data cleanup task, Power Query is Excel's most powerful built-in tool.
Think of Power Query as creating a reusable "recipe" for data cleaning. You define the steps once, and you can execute them again and again with a single click. You connect to a data source, apply transformations like removing duplicates, and specify the output location. The next time you receive that messy monthly report, all you need to do is click Refresh. This is perfect for transforming weekly sales exports, monthly inventory reports, or daily activity logs into clean, usable data.
Building a Repeatable Workflow
Getting started with Power Query is more approachable than it seems. The process begins on the Data tab in Excel. You'll connect to your source data, whether it's another Excel file, a CSV, or a database. Once connected, the Power Query Editor opens, which is where the transformation happens.
Inside the editor, you'll see a preview of your data. To remove duplicates, right-click the header of the column you want to check and select Remove Duplicates. To check for duplicates based on multiple columns, simply select them all before right-clicking.
Power Query records this action as a step in the "Applied Steps" pane on the right. You can continue adding other cleaning steps, such as trimming extra spaces or standardizing text case, to build a complete data cleaning pipeline. When finished, click "Close & Load." Power Query loads a clean, formatted table into a new worksheet, leaving your original data untouched.
The true power of this method lies in its repeatability. Once the query is set up, a tedious, error-prone task becomes a reliable, one-second process that anyone can run.
Supercharging Power Query with AI
While Power Query features a user-friendly interface, its full potential is unlocked through its underlying language, M code. Writing M code can be a significant learning curve for many users. This is where an AI assistant like Elyx.AI transforms the experience.
Instead of learning complex syntax, you can describe the desired transformation in plain English, and the AI will generate the necessary M code.
- "Keep only the newest entry for each customer ID using the 'Last_Updated' column."
- "Remove duplicate rows by looking at both the 'Email' and 'Phone Number' columns, and make it case-insensitive."
This AI-driven approach makes Power Query's most advanced features accessible even if you've never written a line of code. It turns a powerful but complex tool into something anyone can master. For a deeper dive, check out our complete Excel Power Query tutorial.
Avoiding Common Data Deduplication Mistakes
Knowing the tools to remove duplicates is one thing, but using them correctly is another. Rushing the process can cause more harm than good. I've seen it happen countless times—a quick "Remove Duplicates" click corrupts a dataset because of subtle, overlooked details.
The most frequent mistakes arise from easy-to-miss issues like stray spaces or inconsistent capitalization. To Excel, "Apple Inc." and "apple inc" are two unique entries.

Before deleting anything, follow this crucial rule: highlight first, delete later. This simple habit acts as a safety net, allowing you to visually review what Excel identifies as a duplicate. It ensures you don't accidentally remove a critical record. Most built-in removal tools are destructive; once the data is gone, it's gone for good.
Handling Nuances in Your Data
Real-world duplicates are rarely clean copies. To effectively identify messy, near-matches, you must standardize your data before you begin the deduplication process. This preparation is essential for an accurate cleanup.
Here are the key steps for data standardization:
- Trim Whitespace: Invisible spaces at the beginning or end of text are a common problem. Use the
TRIMfunction to clean these up so that " John Smith " is correctly recognized as "John Smith". - Standardize Case: Inconsistent capitalization can cause issues. Use the
UPPERorLOWERfunctions to convert all text to the same case, ensuring "john smith" and "John Smith" are treated as identical. - Combine Columns: A duplicate is often defined by multiple columns. For customer data, for instance, you might need to combine several fields. Create a "helper" column with a formula like
=A2 & B2 & C2to concatenateFirstName & LastName & Email, creating a single unique identifier for each record.
Investing this effort upfront ensures your deduplication logic is robust and you catch the partial duplicates that often slip through.
The consequences of unchecked duplicates are huge, especially in critical fields. Take healthcare, for example. The American Health Information Management Association (AHIMA) considers a 1% duplicate patient record rate the absolute maximum. Yet a shocking 92% of patient ID errors are traced back to duplicates created during registration. The good news? Automated tools have been shown to cut these rates by 30-40% within months, proving that a proactive approach pays off. You can find more about these duplicate record rate statistics here.
The “First-In-Wins” Rule
One final pitfall to be aware of is the "first-in-wins" rule. Most automated tools, including Excel's Remove Duplicates feature, are designed to keep the first record they encounter and delete all subsequent matches.
This can be a problem when the record you want to keep is the most recent one, such as an updated customer address. The solution is simple: sort your data first. By sorting your date column from newest to oldest before running the deduplication tool, you ensure the most recent record appears first. This simple trick forces the tool to keep the exact record you need.
Got Questions? Here Are Some Common Duplicate-Removal Scenarios
Even with the right tools, you'll encounter tricky situations when cleaning data. Here are answers to some of the most common questions about removing duplicates in Excel.
How Do I Remove Duplicates Based on Two or More Columns?
This is a frequent requirement, especially with customer lists or order data. The most direct method is using Excel's built-in 'Remove Duplicates' tool.
When you open the tool from the Data tab, a dialog box will appear with a list of your columns. Simply check the boxes for all the columns you want to use to identify a duplicate. For example, you might select 'First Name', 'Last Name', and 'Email' to remove only the rows where all three of those fields are identical. This prevents you from accidentally deleting records of two different people who happen to share the same name.
Can I Just Highlight Duplicates Instead of Deleting Them?
Absolutely, and it is highly recommended. Highlighting duplicates before deleting provides a crucial safety net, allowing you to visually inspect the matches first. The easiest way to do this is with Conditional Formatting.
Select the range you want to check. Then, go to the Home tab and navigate to 'Conditional Formatting' > 'Highlight Cells Rules' > 'Duplicate Values'. Excel will instantly color all cells with repeated values, giving you a clear visual map of your duplicates. It's an excellent, non-destructive way to audit your data.
What's the Best Way to Keep the Newest Record and Ditch the Old Ones?
This is a classic challenge. Most deduplication tools, including Excel's, operate on a "first-in-wins" basis—they keep the first record they find and delete the rest. This isn't ideal when you need to preserve the most recent entry.
The solution is to reorder your data before you run the tool. Sort your entire dataset by a date or timestamp column from newest to oldest (descending). This simple step forces the most recent record to appear first in any group of duplicates.
After sorting, run the 'Remove Duplicates' feature as usual, selecting the columns that define a duplicate (e.g., 'Customer ID'). Because the newest entry is now the "first" one Excel encounters, it's the one that will be preserved. This two-step process—sort, then remove—gives you complete control over which records you keep.
Tired of manually wrestling with duplicates and complex formulas? Elyx.AI integrates directly into your spreadsheet, letting you clean data, generate formulas, and build reports using simple, plain-language commands. Stop hunting for the right function and start getting answers. Discover how much faster your Excel work can be at https://getelyxai.com.
Reading Excel tutorials to save time?
What if an AI did the work for you?
Describe what you need, Elyx executes it in Excel.
Sign up