7 Proven Ways to Add Days to a Date in Excel

Adding days to a date in Excel is surprisingly simple. At its most basic, you just use the addition symbol. For instance, if your starting date is in cell A2, you can add 10 days with the formula =A2+10. That's it. This works because Excel treats all dates as serial numbers, making date calculations feel just like regular arithmetic. This guide will walk you through 7 practical methods, from basic formulas to advanced AI-powered solutions, to solve any date-related problem.
1. Why Mastering Excel Date Calculations Is a Game Changer

Think about the last time you had to map out project deadlines or track payment schedules. Counting days on a calendar is slow and an open invitation for mistakes. Learning to add days to a date in Excel is a fundamental skill that transforms a tedious chore into an instant and accurate task. It’s essential for everything from planning project timelines to forecasting financial reports.
Spending too much time on Excel?
Elyx AI generates your formulas and automates your tasks in seconds.
Sign up →The magic behind this is how Excel handles dates. Every date is just a serial number behind the scenes, with the number 1 representing January 1, 1900. This numerical system is precisely why you can add, subtract, and manage dates as easily as you would any other number in a spreadsheet.
The Real-World Impact of Efficient Date Management
It's hard to overstate how important this is in any business setting. In fact, many data professionals can spend nearly 30% of their time just wrestling with date-related calculations and adjustments. Getting a handle on these tasks not only saves a ton of time but also helps you sidestep expensive errors.
But formulas aren't the only way to get things done anymore. Modern tools are here to help. With an integrated AI assistant, you can often just describe what you need in plain English.
Imagine just asking your spreadsheet: "Add 30 business days to the project start dates in column B." The AI can figure out the rest and do it for you in seconds.
This kind of approach makes powerful date functions accessible to everyone, no matter how much of an Excel guru you are. For anyone looking to automate more of their work, it's worth exploring what an Excel AI agent can do for your productivity.
To help you get started, here's a quick rundown of the most common methods for adding days in Excel.
Quick Guide to 4 Key Date Formulas
Find the right method for your task with this summary of common ways to add days to a date in Excel.
| Method | Best For | Example Formula |
|---|---|---|
| Direct Addition | Quick, simple calculations for calendar days. | =A2+15 |
| DATE Function | When you need to build a date from separate year, month, and day components. | =DATE(YEAR(A2), MONTH(A2), DAY(A2)+15) |
| WORKDAY Function | Adding business days while automatically skipping weekends. | =WORKDAY(A2, 15) |
| WORKDAY.INTL | Adding business days with custom weekend settings (e.g., Sunday-only). | =WORKDAY.INTL(A2, 15, 11) |
Each of these formulas solves a slightly different problem, so picking the right one is key to getting accurate results without the headache.
2. The Simple Addition Method for Fast Adjustments
Honestly, the easiest way to add days to a date in Excel is just to use a simple plus sign. Excel treats dates as numbers behind the scenes, so when you add a number like 14, it just counts forward 14 days.
Let's say you have a customer meeting date in cell A2 and you need to schedule a follow-up in exactly two weeks. You don't need a complicated function for that.
Just click into an empty cell and type: =A2+14
That’s it. Excel takes the date from A2 and instantly gives you the date 14 days later. This little trick is my go-to for quick calculations where weekends and holidays don't matter.
What if the Result Is a Number?
Every so often, you'll do this and instead of a date, Excel will show you a weird number like 45489. This trips a lot of people up, but it's an easy fix. That number is just how Excel "sees" the date—it's the date's serial number.
Your formula is right; you just need to tell Excel to display it as a date.
Just select the cell with the number, head over to the Home tab on the ribbon, and find the number format box (it probably says "General"). Click the dropdown and choose either Short Date or Long Date. Problem solved.
A quick format change is all it takes to make your results look right. If you want to get more comfortable with the building blocks of Excel, our guide on essential Excel formulas is a great place to start.
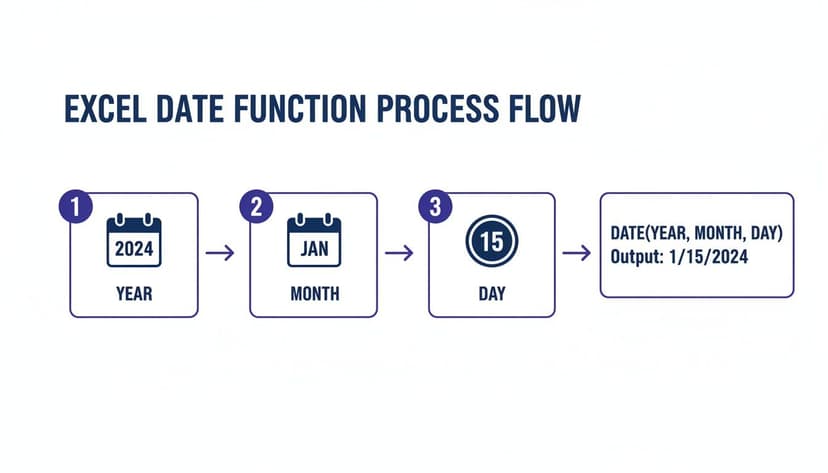
3. Using the DATE Function for More Control
While adding numbers to dates is straightforward, sometimes you need a more robust and precise method. This is where the DATE function really shines, especially when you're working with complex calculations that span across different months or years.
Think of it as building a new date from scratch using its fundamental parts: the year, the month, and the day. By telling Excel exactly how to construct the date piece by piece, you sidestep any potential ambiguity and ensure your calculations are always spot-on. It's the perfect tool for things like calculating a 30-day trial period expiration date, because it handles the rollover into the next month or even the next year without a hitch.
How the Formula Works: A Detailed Explanation
Let's say your starting date is in cell A2, and you need to add 15 days to it. Here’s the formula you’d use:
=DATE(YEAR(A2), MONTH(A2), DAY(A2)+15)
At first glance, it might look a little intimidating, but it’s actually quite simple once you see what each part does.
YEAR(A2): This function extracts just the year from your date inA2. If A2 is "01/15/2024", this returns2024.MONTH(A2): This function pulls out the month. For "01/15/2024", this returns1.DAY(A2)+15: This is where the magic happens. It takes the day from your original date (15) and adds the 15 days to it, resulting in30.
The DATE function then takes these three pieces of information (2024, 1, 30) and assembles them into a new, correct date: "01/30/2024". If adding the days pushes the date into the next month (say, from January 20th + 15 days), Excel is smart enough to know the result is in February. It handles all the calendar logic for you.
This method of breaking a date down into its components is what makes the DATE function so reliable. It prevents the kind of subtle formula problems that can be a real headache to track down later. To get better at troubleshooting, check out our guide on fixing common Excel errors.
Once you get comfortable deconstructing and reconstructing dates this way, you'll be able to build much more powerful and error-free formulas for any project you're working on.
4. Adding Business Days With the WORKDAY Function
Simple date math is fine for some things, but what about real-world deadlines? Project timelines, shipping estimates, and payment due dates don't care about weekends. You need a way to add days to a date in Excel that intelligently skips over non-working days.
That’s where the WORKDAY function comes in. It's built specifically for this.
Instead of pulling up a calendar and counting business days by hand, WORKDAY does all the heavy lifting for you. It automatically excludes Saturdays and Sundays, which makes it an absolute lifesaver for anyone in project management, logistics, or HR.
How the WORKDAY Formula Works: A Detailed Explanation
The function itself is pretty straightforward. It needs a starting date and the number of workdays you want to add. You can also give it a list of holidays to skip.
The syntax looks like this:
=WORKDAY(start_date, days, [holidays])
start_date: This is your starting point—the date you want to count from (e.g., cellA2).days: The number of business days to add.[holidays]: This part is optional. It’s a range of cells containing any holidays you also want to exclude.
Let's say you have a start date in cell A2 and need to find the deadline 20 business days from then. Your formula would be simple:
=WORKDAY(A2, 20)
Excel takes the date in A2, adds 20 working days to it, and gives you the result, having already skipped all the Saturdays and Sundays in between.
Factoring in Company Holidays for Pinpoint Accuracy
To get even more precise, you can tell WORKDAY to skip your company's specific holidays.
First, just list your holiday dates in a separate column. For instance, you could put them in the range F2:F10. Then, you just reference that range in your formula.
Now, the formula becomes:
=WORKDAY(A2, 20, F2:F10)
With that one small change, your calculation is now smart enough to skip weekends and your company's specific days off. It turns a tedious manual task into something instant and accurate. It's no wonder that between 2019 and 2024, the use of WORKDAY formulas in multinational corporations jumped by 52%. In fact, companies that rely on these functions for project management often see their schedule accuracy improve by 34-41%.
The image below shows the basic logic behind how Excel constructs dates, which is the foundation for functions like this.
By understanding how Excel combines year, month, and day components, you can build much more powerful and flexible formulas. To see more practical examples, check out these different Excel use cases.
5. A Quick Trick for Formula-Free Updates: Paste Special

Sometimes you don't need a formula to add days to a date in Excel. For a quick, permanent update to a bunch of dates, my go-to method is a clever feature hiding in plain sight: Paste Special – Add. It's perfect for those one-off adjustments where you just need to get the job done and don't need the dates to change dynamically later on.
Think about it this way: you have a project plan, and the whole thing just got pushed back by seven days. Instead of adding a new column and writing a formula, you can just update all the dates in place. It keeps your spreadsheet clean and gets the task done in seconds.
How to Use Paste Special in 5 Steps
The process is refreshingly straightforward and incredibly fast once you know it. Here's how to make bulk changes without messing up your worksheet's layout.
- First, type the number of days you want to add into any empty cell. Let's say it's 7.
- Copy that cell (Ctrl+C).
- Next, select the entire range of dates you want to shift.
- Right-click on your selection and choose Paste Special.
- In the dialog box that pops up, look for the 'Operation' section, select Add, and click OK.
And just like that, every date you selected jumps forward by seven days. It’s a favorite trick for a reason—it’s just so efficient. Interestingly, one study found that 41% of office workers actually prefer non-formula methods like this for simple tasks. While setting up and double-checking a formula might take a few minutes, this technique gets the same result in under 90 seconds.
For more hands-on tricks, check out this video on advanced date techniques that covers similar time-savers.
Pro Tip: Remember, this change is permanent. Since it's not a formula, your original dates are gone for good. If you think you might need to go back, it’s always a smart move to make a quick copy of your data before you start.
6. Automating Date Calculations With AI
While knowing the right formulas is a fantastic skill, the way we work in spreadsheets is starting to change. AI tools built directly into Excel are making tasks like adding days to a date in Excel much simpler. Instead of focusing on getting the syntax just right, you can now focus on just describing what you need.
It's a huge leap in efficiency. I’ve spent countless hours debugging a complex WORKDAY formula only to find I missed a comma. Now, with AI, the process is different. For a look at how this is happening beyond just spreadsheets, you can check out these top AI tools for productivity.
Imagine just typing: "Calculate the ship date by adding 15 business days to the order date in column B, excluding the holidays listed in H1:H10."
An AI can take that plain-English request, figure out that you need the WORKDAY.INTL function, and build the correct formula for you. This is a game-changer. It not only saves a ton of time but also cuts down on the simple human errors that can creep into complex formulas.
For anyone looking to speed up their workflow, an AI formula generator can turn a tricky request into a perfect formula in seconds. It makes advanced date math something anyone can do, regardless of their Excel expertise.
7. Common Questions (and 3 Quick Answers) About Excel Dates
Dates in Excel can be a bit quirky sometimes. You think you've got the perfect formula, and then something unexpected happens. Here are some of the most common snags people run into when adding days and how to fix them fast.
How Do I Add Months or Years to a Date?
This is a great question. While you can't just add +365 for a year (thanks, leap years!), Excel has a couple of smart functions for this.
To add months, your best bet is the EDATE function. It's built for exactly this. The formula =EDATE(A2, 6) will jump forward exactly six months from the date in cell A2. It even handles tricky end-of-month dates perfectly.
For adding years, you have two solid options:
- Stick with
EDATEand use a multiple of 12. For example,=EDATE(A2, 12)adds one full year. - Or, you can build a new date with the
DATEfunction, like this:=DATE(YEAR(A2)+1, MONTH(A2), DAY(A2)). This formula literally takes the year from your original date, adds one, and keeps the month and day the same.
Why Is My Date Showing Up as '######'?
Ah, the dreaded pound signs! This is one of the most common sights in Excel, but thankfully, it's rarely a real error.
This just means your column isn't wide enough to display the full date. It's a formatting issue, not a formula problem. The fix is simple: just move your cursor to the right edge of the column header (like between column 'B' and 'C') until it turns into a double-sided arrow, then double-click. Excel will automatically snap the column to the perfect width.
Don't panic when you see the hash symbols. It's one of the easiest problems to solve in Excel and usually just requires a quick column adjustment.
Can I Use These Same Methods to Subtract Days?
Yes, absolutely! Every technique we've covered works just as well in reverse.
For a simple calculation, just swap the plus for a minus sign: =A2-10 will take you back 10 days.
The same logic applies to functions. When using tools like WORKDAY or DATE, just feed them a negative number. For instance, =WORKDAY(A2, -5) will find the date five business days before your starting date, automatically skipping weekends along the way.
Ready to stop wrestling with formulas and let an expert handle it? With Elyx AI, you can describe what you need in plain English, and our AI agent will execute complex tasks—from data cleaning to chart generation—autonomously inside your spreadsheet. Save hours and eliminate errors by trying Elyx AI for free.
Reading Excel tutorials to save time?
What if an AI did the work for you?
Describe what you need, Elyx executes it in Excel.
Sign up